Learn Web Design – Introduction to HTML
HTML in Web Design
HTML tags are the building blocks for web design. In order to display content on a web page you use code snippets called tags to add the required content to your web page. A sample tag is
[sourcecode language=”html”]<img />[/sourcecode]
This helps you to add an image to your web page. Another tag is the paragraph tag
[sourcecode language=”html”]
<p> </p>
[/sourcecode]
which, as you guessed it, adds a paragraph of text to your web page.
In this course we are going to learn xHTML which is a specific version of HTML. xHTML is a good version to learn as it works well on all browsers and promotes good coding practices on behalf of the coder.
Becoming a Web Designer
Becoming a web designer takes time. Even now, 15 years after creating my first website, I am learning new and better ways of doing things and becoming a better web designer.
HTML is easy to learn. There is a limited set of tags to learn. However, correctly using these tags takes time to learn. The last thing we need are more bad web developers creating bloated, slow code for unsuspecting web design customers.
You need more that just HTML to become a web developer. HTML, CSS, JavaScript and a server-side language such as PHP are desirable skills. If you are working as a freelancer you may also need to learn about graphic design, interface design, database management and server maintenance. However, it all starts with learning HTML.
I hope that this course will start your journey to becoming a great web developer, creating great sites for your clients.
Structure of a HTML Document
HTML documents are structured into two parts:
the head defined using the opening and closing head tags:
[sourcecode language=”html”]
<head>
</head>
[/sourcecode]
and the body
[sourcecode language=”html”]
<body>
</body>
[/sourcecode]
Both of these are located between the opening and closing html element, so the basic layout of a web page is:
[sourcecode language=”html”]
<html>
<head>
</head>
<body>
</body>
</html>
[/sourcecode]
You can try to execute this code now but nothing will happen. Soon we will see how we can add actual content to our web page.
As you may have figured out by now, the html, head and body tags consist of the tag name enclosed within angle brackets. The first instance is known as the opening tag and the second instance (preceded with the backslash / is known as the closing tag). Most tags (or elements) consist of an opening and closing pair but some are self-closing by adding a forward slash at the end of the tag.
Opening and closing body tags:
[sourcecode language=”html”]
<body>
</body>
[/sourcecode]
Self-Closing img tag:
[sourcecode language=”html”]
<img />
[/sourcecode]
More About the Structure of a HTML Document
The head contains information about the document that is not generally displayed within the document, such as its title.
The body contains the body of the text, and is where you place the document material to be displayed in the browser window
Elements allowed inside the head, such as title, are not allowed inside the body, and vice versa
Adding Content to our Web Page
So far we have created the basic code for a web page. Next we need to add some content to our page. We are going to start by adding some simple text to our page. When you want to display something on your web page you must place that content between the opening and closing body tags as shown here:
[sourcecode language=”html”]
<html>
<head>
</head>
<body>
This is some text that will be displayed on our web page
</body>
</html>
[/sourcecode]
As you can see, we have added some plain text content between our opening and closing body tags. This text will be displayed when we save and run our web page.
Saving a Web Page
In order to write HTML code you will need a simple code editor. I recommend Notepad++. It is free, comes with syntax highlighting to make it easier to code and has good file organisation compared to it’s poor relation Notepad.
You should not use Microsoft Word or another word processor for writing HTML code as these programs come with their own background code which may interfere with your HTML when executed.
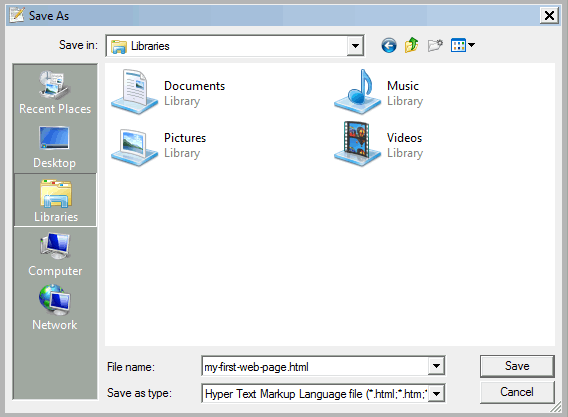
- Open Notepad++ and write the code exactly as shown above.
- Select File > Save As and the Save Dialog opens.
- Choose a convenient location for your web page. I recommend creating a folder called HTML. Within this folder you can create more folders to organise your HTML files and images week by week.
- Choose a meaningful name. Do not use the default “untitled” or “new”. Save the file with a memorable name so that you can easily find and identify it later. Don’t use any spaces or special characters (!”£$%^&*()) in your file name. Stick to letters, numbers and dash or underscore if needed.
- In the Save As Type dropdown you should choose Hyper Text Markup Language file. This will add the .html extension to your file. This is important as the browser will now know how to execute this file. It will render the code as expected and not just display the tags as text. .htm is also a valid extension. You should choose one or the other. Do not combine both as it will lead to confusion and broken links in your file
- Finally click Save.
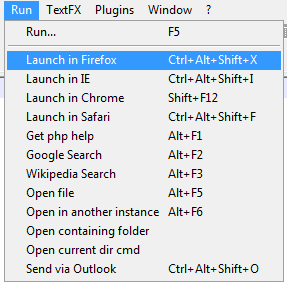
Viewing Your Web Page
You can open your web page in a browser using a Notepad++ menu: Run > Launch in ________. Your browser name should be displayed in place of the underlined. Notepad++ supports Firefox, Internet Explorer, Chrome and Safari among others.
Your browser will open and your web page will be displayed. You should see the text “This is some text that will be displayed on our web page”. Congratulations, you have created your first web page and are on your way to becoming a web design master.
In our next lesson we will learn more about HTML tags and their attributes. Attributes add more meaning to tags. We will also look at the different versions of HTML and the benefits of using xHTML.
Follow me on Twitter of Facebook to be the first to know when the next lesson is published.
Get Started - Contact Us
Get in touch to discuss your website or ecommerce design.
Please enter as much information as possible about your website requirements so that we can provide an accurate estimate.


